Getting a decent print from your 3D Printer is supposed to be easy. But it rarely is so. Virtually all 3D Prints can prove hard to print, but only if you don’t know what you’re doing. Getting a fair idea about printing objects in 3D takes a lot of hit and trial, where you must learn from your errors. However, not everyone has that sort of time on their hands.
That is, of course, if you can’t find a way to hasten the learning process for yourself. And we have all you need to do that right here. We’ve previously covered the top 3D Printing tricks, which you can find here. Don’t be surprised if you find common threads, after all, 3D printing is an interplay between the same 3 factors of right material, right design and right technique.
The Conclusive Guide To Getting Perfect 3D Prints
What’s that about the 3 factors? Well, these 3 factors are everything your 3D prints need to balance out to get the best possible quality as well as provide the most ease in creation. These three are explained as follows.
Right Material

In order to get the best 3D Prints, using material that is good in quality as well as suitable for the design and parameters you are employing is very essential. There are spools of several types of plastic, all with their distinctive properties that vary with make that are available for purchase.
Each of these materials (with a few exceptions) are built with specific design specifications in mind. The prices are just as varied as well. For a beginner, the cheapest spool is usually the best.
But if you’re really serious about 3D Printing and want to get the best results, it is important to study and ponder upon the properties of each material make and their properties so you can understand if and how they will fit with your needs.
Right Design

Designing your object before printing it out is not just good for you, it is actually required. And so to get a good print means to work for a great design.
Even if it is a cube you want to print out, there’s a lot of thought that needs to be put into about how you want the cube to be printed. Aligning the object’s centre on gravity in a stable position goes a long way in ensuring your object doesn’t turn out with crumpled edges or unwanted bends.
Designing also prevents wastage, because you won’t have to trash a painstakingly printed object, plus you avoid unwanted spirals of wasted plastic ribbon from engulfing your print.
Right Technique
By technique, you might assume there is not much you need to take care of, since 3D Printers are mostly automatic. That is the biggest misconception about 3D Printing that beginners have.
There is of course the need to check on a print in progress every little while as convenient, so you can terminate a print that’s going wrong without wasting more spool. But apart from that, there’s things related to designing that decide what technique is going to work for your print.
For example, printing negative space can get you a mould of the object you want. Using support elements can prevent your prints from failing badly. There’s a lot to technique, really.
Working on just one of these factors won’t help you out either. All three of them are related to each other. Your design influences the technique and the suitable material, and different materials work with different designs and techniques and so on.
So figuring out an object you want to 3D print in light of all three of these can be a tough nut to crack.
Not to worry, however. We’ve assembled a list of 10 things to watch out for that are automatically going to bring the 3 major factors into mutual balance.
Please remember that this list doesn’t guarantee a perfect print each time. In fact, nothing but practice can do that. But they sure are going to raise your levels of success at 3D Printing. Here they are…
Print Small and Assemble
When you have a small object such as a figurine you have designed, or something complicated like a fancy pencil sharpener that you want to print out, designing the object can be learned.
Where the failure most often happens is in the printing itself. There is either a whole lot of stray ribboning that you need to cut and polish through, or you’ll find the details hard to render with the hot flowing plastic. What can you do?
Well, at the designing stage, you can make sections of the object based on your understanding of how they will be easy to render. So if, for example, you are printing a Captain America figurine.
The legs and arms can prove difficult to render, since they are not necessarily going to be arranged in the bottom up arrangement in which 3D printing usually works.
So, you can make sections of the figurine that will be easier to print. For example, you could print the legs, arms and the shield separate from the torso.
Once you have printed the figurine, you can always glue them together using strong adhesive. You can even use 3D Pens for simple detailing.
Break Up Object Into Several Parts
The same trick can be scaled up and made useful for big things that you might want to print, that might not necessarily fit in the printer. Cosplay costume elements are my favorite example for this, given how crazy their designs can be.
As disingenuous as it might appear, breaking up a design into several components can actually make your printing more efficient. Want to print a patchy face mask? Why not print the patches separate, and then sew them together with some wool?
This goes further too. Want to print a rake for the leaves in your garden? You can print the toothed part separate from the stick itself. A few screws should keep the two in proper embrace.
And this way, you’ve saved yourself a herculean task of printing the object horizontally which would surely have given rise to frayed ribbons at the toothed end.
Paint Afterwards
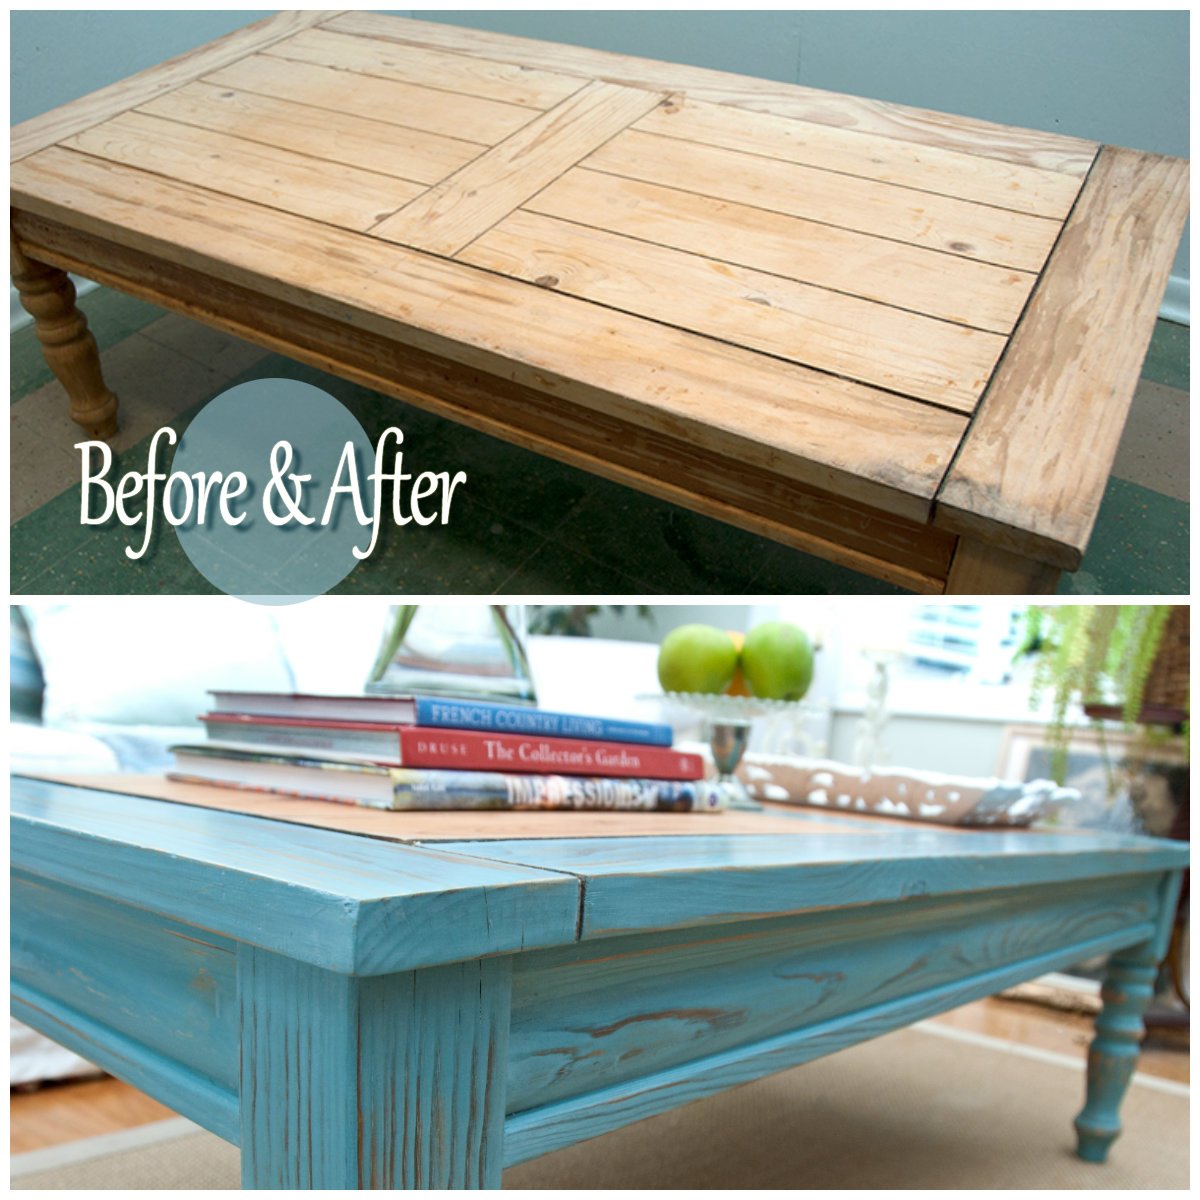
You know the silliest thing beginner 3D Printers do? They chase new spools of input material based on the color they come in. Spools are expensive. Making a rainbow colored pencil holder is great, but you needn’t but 7 spools of different colors for it!
The problem is not limited to wasteful expenditure. Often, when there is little chance of finding the proper color in the same build or material, people switch to whatever spool they can find, only caring about it being the right shade.
Fact is that not all material are compatible with each other. They have different properties, different reactions to the same kind of stress and even different shelf lives.
It will not only fill your garage with spools of material you’re probably not going to use a second time, but also make your design more likely to fail.
You can always print the object in one go, and then color and decorate it later. There are a ton of water based colors as well as those with organic solvents, each with their own advantage.
If nothing else works, you can always paint with acrylic colors or spray cans.
Put a Lip On The Base
You might recognise this from our article on tips to get better prints. But it really is that important. If you’re interested in knowing more about this, I recommend paying a visit to that article.
Basically, your printing plate has quite a grip, which can be unwelcome since yanking out the object from the plate can chip an edge or rough up the surface, which is really unwelcome.
So you put in a bit of a taper downwards in the design such that you have an angle with the plate you can perhaps put a screw driver in to pry out the object.
You need to remember that using a screw driver too can damage an edge, and so the object might not please the perfectionist in you. To take care of that, put an additional thickness at the base (don’t overdo it.
Maybe just a millimeter or half). Once you have pried the object free of the board, you can polish the surface by shaving off the extra material. If your design doesn’t require a taper, the tapered bit can count as this additional thickness as well. Don’t put too much additional thickness, though. It is ultimately going to go into the trash.
Recheck Your Design
A lot of beginners try out different ways to print their objects, but things always go awry. It might not necessarily be something going wrong with the technique, though.
With proper material, you should be able to print your object fine. The problem can often lie in the object’s designing. We already talked about breaking up your object into smaller, more manageable pieces in points 1 and 2. This is different, however. Some designs require an additional help to print out properly.
For example, if you have a design that you are trying to print which has a weight attached to a narrow strait, printing it upwards can not just result in the strait collapsing, but also breaking after completion when you’re trying to pull the piece out of the printing plate. All of that effort will have to be for nothing.
Instead, you can make the narrow strait into a thicker channel, and you can always polish off the extra plastic with a chisel or other sharp instrument.
It prevents distortion as well as gives you a better chance at getting the piece sharp and in order. Or, you can always go to point 1 and 2 and print out parts to assemble later.
Modify Your Building Material
Not all plastics are created equal. Some will work better at higher temperatures, others will solidify to a much better finish, and some might help you print more durable objects than other.
Then of course, you can get fancy looking spools of plastic that are a beauty unto themselves. And switching between these materials can significantly alter what you end up walking away from the printer with.
There is no trick with these materials; you have to understand and intuit their properties , committing them to memory so you know what you can try with each and what would turn out badly.
An example would be the classic PLA vs ABS Plastic material, and all their subdivisions and variants. PLA can be hard to mould into intricate shapes. But for bigger surfaces, it gives a much more accurate result than ABS, which though great for detailing will often have the surface in contact with the printing plate warping due to the heat.
Unfortunately, you cannot turn off the heat and expect a decent product to result. So while each type of material has its perks, there is no absolute better of the two, and you can always switch in your next print, or even use materials in combinations!
Adjust The Properties Of The Printing
A lot of times, people blitz past the screen displaying parameters for the printer to work with. “OK”, “OK”, “OK”, and now to wait for my new fancy spectacle frames. Right? Wrong.
It can be inviting to race through the menus and instructions. After all, you’re going to be keeping an eye on the whole process while it’s happening, right? Well, having any one of the several parameters wrong can change the results you get from your 3D printer.
The exact number of properties varies with printer makes and material, but the two main properties one just cannot afford to skim by are temperature and extrusion.
If the plastic is too hot, it will be too melty and might not acquire the proper shape or structure. It might prove hard to finish as well. On the other hand, if it is too low, it just won’t come out of the nozzle in the probe and do its job. You’ll only end with a long, pointless ribboned piece of garbage.
You don’t want that. Ditto with bad extrusion; you want the plastic to flow out properly or you’ll have poor finishing and poor structural integrity. Adjust them to a proper level.
You can read more about the proper temperature and other properties in the manuals of the printer machine as well as the spool.
Are You Getting Proper Power Supply?
While it is not a problem many have to deal with, having an erratic power supply can really play truant with your printing plans.Most printers reset when the power stops, which means you have to refurnish the instructions to print the same object. The last one is almost always trash, even if it was about to be finished.
That is the visible part of the problem. But there is a more hidden aspect of power supply that can disturb your printer and cause improper changes in your printer’s control of the parameters, and that is voltage.
This is especially the case with people who assemble their own DIY 3D Printers, though there are corporate-produced 3D printer users who have faced similar problems as well.
Fluctuations in voltage can produce differences in the effective temperature and the movement of the many motors and moving components, thus creating problems in your object’s final appearance.
You can always get a power supply with coltage control to manage the issue. There are several such systems in the market which are even capable of running the printers for 3-4 hours. That’s about the amount of time one would need to finish a printing task.
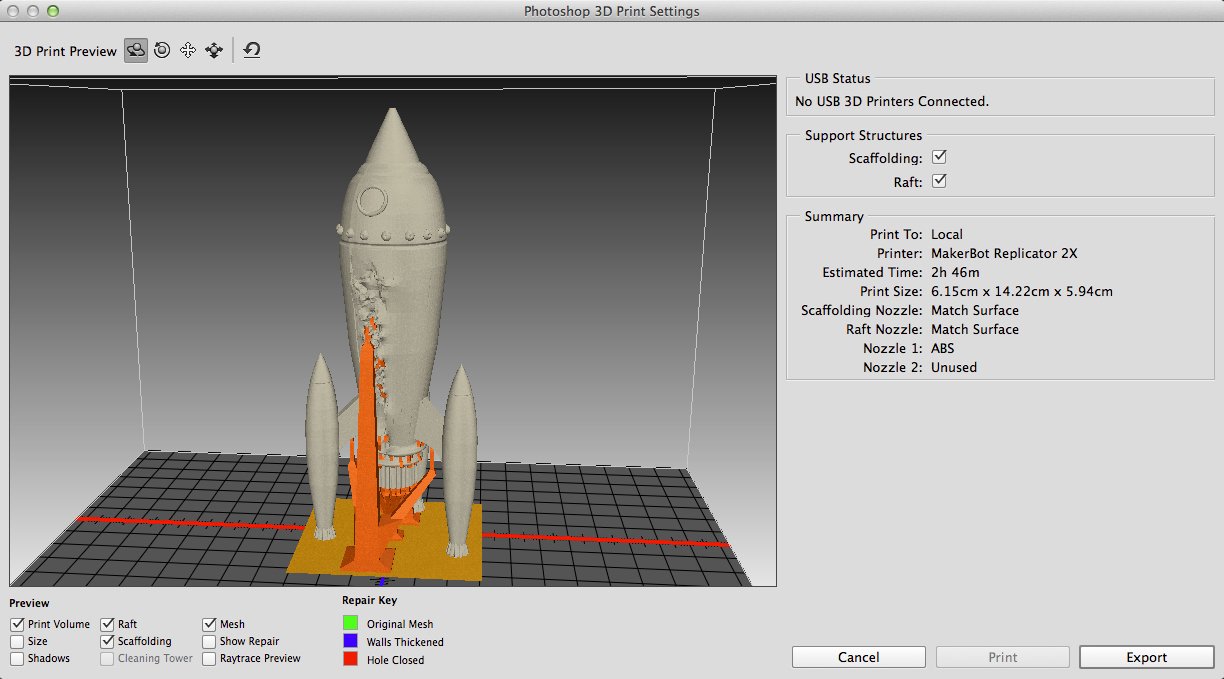
Use Stilts To Support The Print

When you’re trying to print a 3D model, there are bound to be objects that are far away from the centre, or otherwise not propped up but only held by tension in their elements.
Things like the tail in a dog figurine, or the barrel in a gun model. That might not seem like a big deal, but when you begin printing, there is not enough time for the hot plastic to cool in place.
This can mean your precious art piece can droop inside the printer itself. IT won’t be decent enough to show anyone at all.
While designing, therefore, you can include stilts for areas projecting too far away from the centre of mass. This gives a welcome support to those areas, and you have much better results to show off later.
After the printing is done, you can simply cut away the supports, and you’ll have a neatly finished object to use or decorate your place with. I first used this technique when I printed a star for the top of my Christmas tree using my 3D printer, and let’s just say I have never found a more helpful thing in my life.
Print an Alternative
A lot of times, an object is just not supposed to work out. There is nothing to blame. There are just too many factors to manage at the same time. That’s not to say you should give up on your quest of 3D printing whatever it is you need.
But it helps to see if there is another way to do things. For example, people who have trouble printing out negative spaces can instead print the object, and then use some play dough followed by some POP to create a mould for the object. You can chisel and craft it all you want afterwards.
Finding an alternative shape to print is not easy though. A lot of times it is not possible, since the level of detail in alternatives is not the same, and a less detailed object might not fit the purpose.
But there are definitely alternatives to everything. For example, if you cannot print out a flute, print only the beak assembly and attach it to a pipe you get drilled from a hardware shop.
Or, you could improvise in making oil lamps by using a metal wire as a wick holder and letting the oil be contained in a bowl you can easily print in plastic from the 3D printer (be careful.
Plastics are very flammable). There is effectively no limit to what you can do with a little bit of creativity.
Taking these points in mind, give your 3D printer a try once again. You might be surprised at the results yourself. Let’s quickly sum up our points.
Quick Summary
To get good prints from your 3D printer, you have to take care of 3 major factors, which are design, material and technique. Keeping a tab on these three can be quite tiring, so we made 10 points you could make note of with your prints to get better results.
The first was to print small pieces of the object and assemble them once they were all ready. The second was to break up a big object you wanted to print into several parts.
It not only helps you get an idea about the design, but you can actually go ahead and print them out individually like the previous point. Third, painting after your print has been completed is much better than hunting for exotic colors and troubling yourself with too many expensive spools.
Putting an extra margin of thickness on the base is fourth. You can safely pry it off the printing plate using a screw driver, and the rough finish can be chiseled and polished off. Rechecking your design in case things go wrong over and over is important, and so it is placed fifth on our list. You can modify your building material to get results more to your liking.
And so we placed that sixth. Seventh is adjusting the properties of the printing task, where properties include temperature, extrusion and more parameters that you are prompted with when you’re queueing a print.
Eighth, we discussed how it is essential to have a power backup system with a voltage stabilising unit to guard against outages and voltage fluctuations which can abort or otherwise spoil your 3D printing project, making all that time and effort amount to nothing.
Use stilts to support the print in the areas it has pieces jutting out, away from the centre of gravity, like we talked about in the ninth point. And finally, recognising that some designs are hard to print and the effort can be for very little profit, we stressed the importance of considering to print an alternative shape or object that is perhaps easier to make, in the tenth point.
Whew! That was quite the list, no? Still think there’s more one can do to get those perfect 3D prints in their 3D Printer? We want to hear your ideas in the comments below!